Image-taking Workflow
/The most important part of any photography workflow is the actual act of taking an image. When doing so, why should you turn your camera off automatic mode? Because it's not as creative as you are. Even the best camera in the world can't possibly know the type of image you desire. You wouldn't let your camera decide what lens to use, how much to zoom, or which direction to shoot, so don't let your camera decide aperture and shutter speed. Take control and move away from automatic mode!
The best modes to start with when moving away from automatic are aperture priority (Av on Canon cameras; A on other cameras) and shutter priority (Tv on Canon cameras; S on other cameras). As their names suggest, the modes differ in what the photographer deems a priority. In aperture priority mode, the photographer has decided that aperture (which impacts depth-of-field) is most important. In shutter priority mode, the photographer has decided that shutter speed (which impacts subject blur) is most important.
Image-taking Flowchart
Based largely on Bryan Peterson's wonderful books (such as Understanding Exposure, a great resource for learning photography), I've broken down images into five types:
- everything in focus
- maximal subject sharpness
- sharp subject and blurry background
- frozen action
- show movement
The following flowchart explains the camera settings that create each type of image:

Image-taking Workflow
Everything in Focus
If you want everything in the frame to be in focus (as you usually do when taking scenic or landscape images), switch your camera to aperture priority mode and configure a large F number such as f/18, f/22, or even higher. (For the purposes of this article, it's not important what those numbers actually mean.) For example, in the following scene from Algonquin Provincial Park, I wanted both the foreground rock and background trees to be in focus so I configured my aperture to f/18. This meant that the camera had to use a shutter speed of 15 seconds to ensure that enough light hit the sensor, which necessitated the use of a tripod.
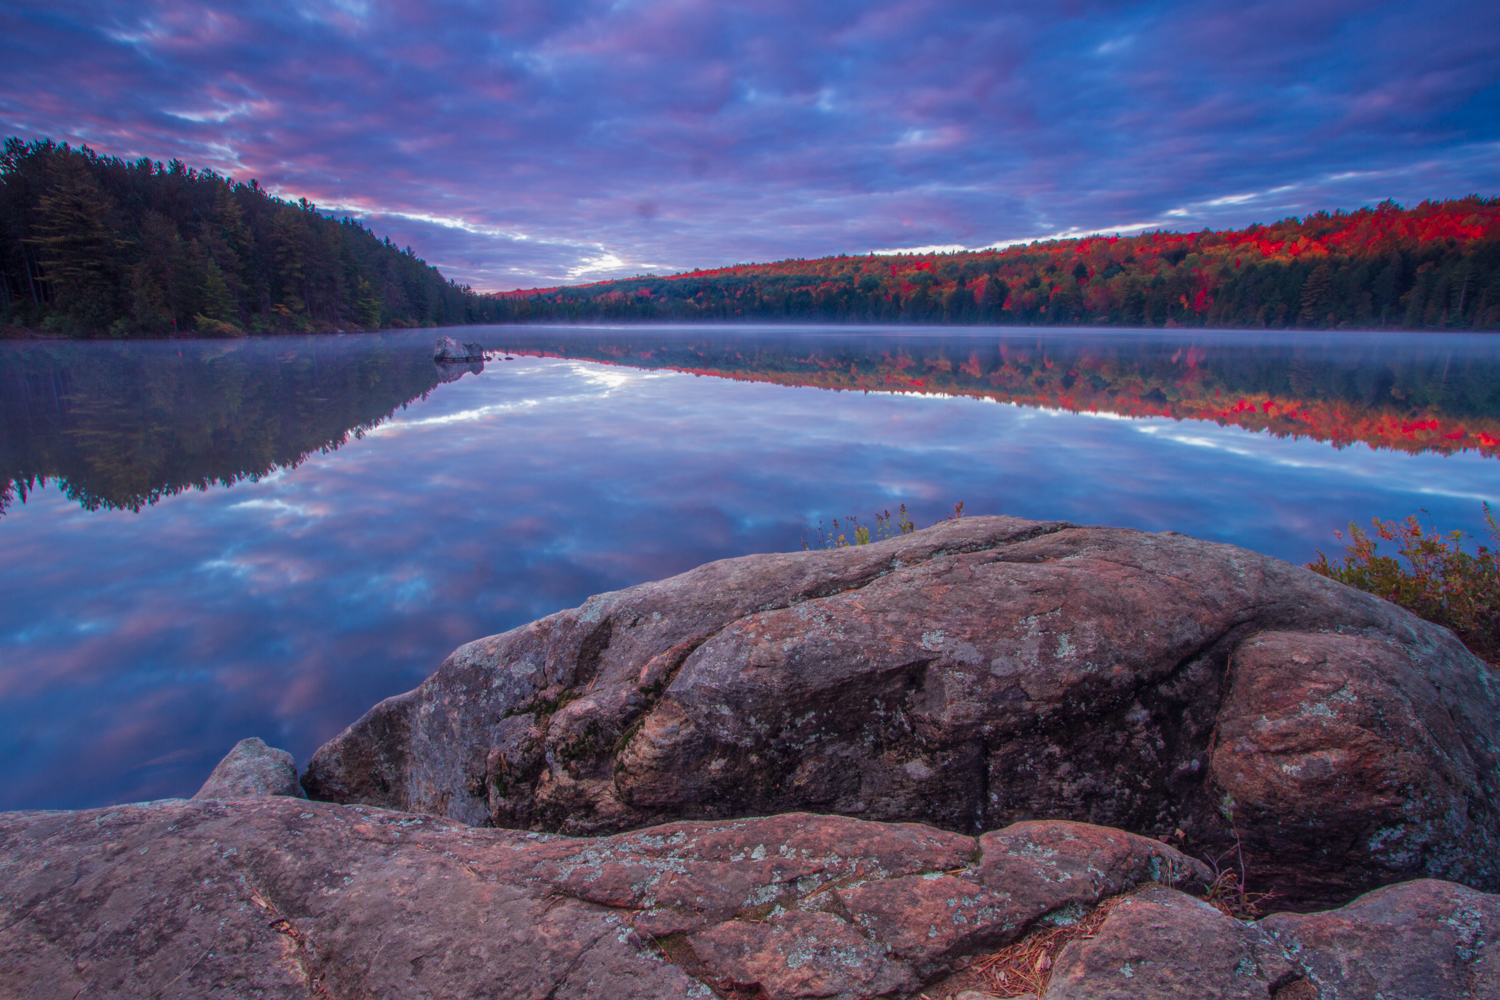
Everything in focus. f/18; 15 seconds; ISO 100
When in aperture priority mode, the configured aperture can drastically impact the resulting image. For example, here are two images of the same scene taken in aperture priority mode, the first at f/32 and the second at f/4.5 (the smallest F number allowed by the lens that was used):
Aperture is important! F/32

APERTURE IS IMPORTANT! F/4.5
Only you know which of these images you want. Take control - don't let your camera decide!
Maximal Subject Sharpness
Maximal sharpness depends on the lens, but a good rule of thumb is that a medium aperture around f/5.6, f/8, or f/11 is best. When I'm looking for birds, my primary concern is getting the subject as sharp as possible, so I usually configure my camera to use f/8 in aperture priority mode. That was my setting when I found this yellow-rumped warbler:

Maximal subject sharpness. f/8; 1/1600 second; ISO 800
Sharp Subject & Blurry Background
If you really want to blur the background to make the subject stand out, use aperture priority mode and configure a small F number such as f/4, f/2.8, or lower if your lens supports it. For example, I didn't want the background greenery to distract from the main subject in the following image so I used f/4:

Blurred background. f/4; 1/500 second; ISO 200
When using a small F number, the depth-of-field is extremely narrow (notice how the crane's neck and the front of its bill are out of focus). Therefore, it's important to focus properly. With animals, the point of focus should usually be the eye as it is above.
Freezing Action
If you want to freeze action, shutter speed becomes more important than aperture so switch to shutter priority mode and configure a fast shutter speed of 1/1000 second, 1/2000 second, or even faster. Two such cases that arise in nature photography are when you want to freeze movement of an animal or show water droplets:

Frozen Action: f/8; 1/2000 second; ISO 800

Frozen action: f/8; 1/2500 second; ISO 800
These images would have a different feel with a slower shutter speed - the bird's wings and water would be blurred. Maybe that's what you want but how is your camera supposed to know? Take control - don't let your camera decide!
Show Movement
If you want part of an image to be blurred to show movement, shutter speed is again more important than aperture so switch to shutter priority mode and configure a slow shutter speed such as 1/80 second or 1/20 second. When using slow shutter speeds, it's absolutely vital to use a tripod or other support to ensure the camera remains motionless.
You frequently want to show movement with waterfalls and much experimentation is required. The "correct" shutter speed to use depends on how fast the water moves and your artistic goal. Here are two images of the same scene taken with different shutter speeds:

MOVEMENT: f/13; 1/40 second; ISO 1600

MOVEMENT: F/13; 0.4 SECONDs; ISO 100
Which image do you prefer? I like the one on the right but that doesn't really matter. What matters is that in shutter priority mode, you get to choose which image you take. In automatic mode, you don't get to decide.
Here are some other moving water images with various shutter speeds:

Movement: f/13; 1/8 second; ISO 200
MOVEMENT: F/13; 1/6 SECOND; ISO 800

MOVEMENT: F/13; 1/2 SECOND; ISO 100
If you're at a waterfall at night, you may need a very long exposure. For example, this image required an exposure of six seconds:

MOVEMENT: f/20; 6 seconds; ISO 100
I hope this article has encouraged you to move away from automatic mode. Try aperture priority and shutter priority and keep making great images!